Friday, May 21, 2010

Geotag a Photographic Record of Your Next Road Trip

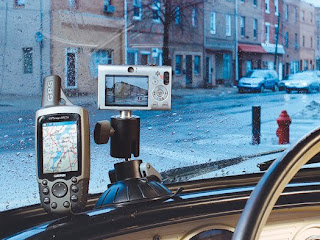
Sure Shots Special firmware allows you to set the camera to automatically take a picture at regular intervals, while the GPS records the location.


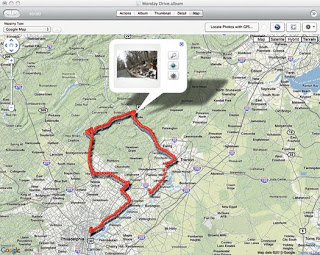
Use a GPS, a dashboard-mounted camera and special software to create a photographic record of your next road trip. I’ve always loved taking pictures from the road when I travel, but on returning home I often had no idea where I had shot many of them. The only way to figure it out was by placing them on a timeline and working backward through my route. Recently I found a way to make it easier. I mounted a Canon digital camera on the dashboard of my car, installed software on it that enables it to automatically shoot pictures every few seconds or minutes, and set up a GPS unit to record the location of each shot. When the trip is over, I just load all the photos and the GPS track data into a geotagging program, which matches the images with the locations. A variety of programs are available, including free, open-source applications such as Geotag (geotag.sourceforge.net) and a plug-in for Aperture, Apple’s high-end image-management software. I chose to use JetPhoto Studio Pro, a great app that runs on both Mac and Windows that you can download for $25 at jetphotosoft.com. The software plots my trip photos on a map, along with any text captions I want to add, using Flickr, Google Maps or even Google Earth: instant travelogue.


Record Your Road Trip
For more details and to see the author’s route, go to popsci.com/geotagger.

Time: 2 Hours

Cost: $60

Difficulty: Easy


1. Download the CHDK software from chdk.wikia.com and load it onto an SD card. Put the card in your Canon camera and boot it with the new firmware, which will let the camera automatically snap pictures at regular intervals.


2.Download and install the script (from popsci.com), which lets you set the interval for shooting.

3.Set your GPS to begin logging a “track.”


4.Mount the camera on your dash (with shot settings on Auto), pointed at the roadside over your hood, and go for a scenic drive.


5.Download the GPS log file and the pictures to your computer. Open the geotagging software. Load the pictures and the GPS log file, and tell the software to perform its geotagging magic. If you’d like to see your trip plotted on a map, use the software’s “export to Google Earth” function. By modifying a few settings, you can also have pictures automatically placed on a map when you upload them to Flickr.

Thursday, May 20, 2010

Tomorrow's Hybrid


The ReCharge, Volvo’s concept plug-in hybrid could squeeze 160 miles from a gallon of gas by tossing out the power-wasting transmission. It packs a small electric motor inside each wheel so that no power is lost in the drivetrain. Here’s a look at the next generation of fuel-efficiency.
How Wheel Motors Drive the Car

Putting electric motors directly inside the wheels eliminates the transmission, which typically wastes 10 to 20 percent of the engine’s energy. An interior disc mounted to the wheel bearings contains a series of independently controlled electromagnets, which emit a magnetic field in response to an electrical current. Around that an outer ring contains permanent magnets. Step on the accelerator, and a computer in the interior ring begins to rapidly switch the polarity of the electromagnets, repelling or attracting the permanent magnets. The faster the polarity changes, the faster the motor spins the wheels.

The challenge is controlling four independent motors. If one spins even slightly faster, the car could veer violently. The ReCharge team’s next big hurdle is refining the software that maintains precise control. As for performance, the car will have permanent all-wheel drive with no gearbox standing between your foot and the motors. In other words, it should go like a rocket.

Batteries power all four motors and the car’s electronics. Unlike most plug-in hybrids, the ReCharge uses a lithium-polymer (rather than lithium-ion) battery. This is not only safer,it also uses sheets of plastic instead of a volatile electrolyte solution. However, it also powers the car for 60 miles before the engine kicks in to recharge it. Small lithium-polymer batteries have started to show up in gadgets such as the iPhone, but Volvo gets its larger, experimental versions from an undisclosed manufacturer. A plug-in concept from Volvo brings the power inside the wheels for increased efficiency and extra mileage.
The engine charges the battery when the car isn’t plugged in. The concept design calls for either a 1.6-liter flex-fuel or turbodiesel engine, but since the engine doesn’t have to actually spin a drive shaft, a fuel cell or a second battery could do the job just as well. It would kick in to recharge the battery only after the battery was at 30 percent capacity, so the ReCharge could travel 160 miles on a single gallon of gas.

A charger feeds power to the battery when the car is plugged in at home. Eventually, the ReCharge will be equipped with an intelligent version that can automatically sense strain in your area’s electrical grid and either cut back its power consumption or feed electricity from its battery back into the system.

Tires must be as thin as possible since the motor makes each wheel bigger.The ReCharge uses specially designed Michelin tires with a soft, resilient surface that also reduces rolling resistance.

Friday, May 14, 2010

Gray Matter: How to Start a Fire With Only Compressed Air


Piston Pyro: A thick-walled acrylic tube with aluminum plunger (from $45; survivalschool.com) forms a demonstration fire piston. It reveal a bit of cotton set alight by pressure alone.

You’ve probably seen contestants on Survivor trying to make fire by rubbing sticks together or concentrating sunlight with their eyeglasses. But, among preindustrial fire-starting methods, it’s hard to beat the portable convenience of fire pistons used in Southeast Asia since prehistoric times.
Almost all gases heat up when compressed. The harder and the faster the compression, the hotter the gas gets. It is hot enough even to ignite cotton wool or other flammable materials. Diesel engines also work the same way. They have no spark plugs but rather, the fuel/air mixture is ignited by compression as the cylinder closes up.

Perhaps most surprising is that this same principle also explains how many high explosives work. They are called “high” because their explosive reaction expands through a supersonic pressure wave that travels much faster than ordinary burning that makes them far more powerful than low explosives like gunpowder. Each successive bit of material in a high explosive ignites when the pressure wave compresses and heats trapped microscopic bubbles of gas. When manufactured without bubbles, even extremely powerful high explosives can be impossible to detonate. Without gas to compress, there is no way for the detonation wave to heat up neighboring areas.

For example, ANFO (ammonium nitrate/fuel oil) explosive mixtures, commonly used in mining, don’t always naturally contain enough trapped gas, and require a “sensitizer” to render them reliably explosive. It's often just a slurry containing hollow glass microspheres.

Some high explosives also create heat through the friction of microscopic crystals rubbing against each other. However, in many cases, the difference between bang and no bang is just hot air.


Fancy Fire is another type of igniter that just also need compression of gas. A beautifully made wood-and-metal fire piston with a cost from $65 (wildersol.com); designed for lighting campfires or other survivalist needs Mike Walker

The Deepest Drill

A massive floating laboratory is attempting to drill through four miles of seabed to take samples of the Earth’s mantle.


The world’s deepest drill is about to get taller—tall enough to dig into Earth's mantle. Already, the Chikyu research vessel is capable of fetching samples at depths of 23,000 feet below the seabed, two to four times that of any other drill. In 2007, off the coast of Japan, it became the first mission to study subduction zones, the area between tectonic plates that is the birthplace of many earthquakes. Over the next three years, scientists will tack on at least an extra mile of drill and attempt the most ambitious mission ever: piercing the Earth’s mantle. There, scientists expect to find the same conditions as those in the early Earth—and perhaps the same life-forms that thrived then.


Design Highlights of the Chikyu Research Vessel

Derrick: The main hoist winch and a system of elevators lifts 1,250 tons of pipes and machinery through the 72-foot-wide opening in the bottom of the ship.

Riser Pipe: A four-foot-diameter steel pipe called a riser connects the ship to the borehole. Outside the riser are several hoses and smaller pipes for recirculating the synthetic mud and controlling the blowout preventer. The riser’s inner hollow core (a pipe within a pipe) is reserved for the drill string. At a 1.6-mile depth, the assembled riser weighs 1,000 tons.

Planned UpgradesTo drill in deeper waters, engineers will either replace the steel riser with one made from a lightweight material like carbon-fiber-reinforced plastic or they will use two pipes—one for the drill string and a second, small-diameter pipe to return the spent drilling mud back up to the ship for recycling.

For deeper ground penetration, where temperatures can exceed 500°F and corrosive chemicals reside, engineers will use a higher-tensile-strength steel to build the drill string. Also in development are new drilling muds that cool the drill bit during operation.

Blowout Preventer: This five-story machine sits on top of the borehole and monitors the intricate balance of pressure within. If it detects a sudden increase in pressure, it can seal off select valves or the entire hole to prevent an explosion.


How to Reach the Mantle


1. Get in Position Using GPS and transponders on the ocean floor, the ship’s positioning system measures the forces acting on the craft, such as wind, wave and current direction and speed. Six computer-controlled propellers will keep the ship from drifting more than 15 feet in any direction.

2. Assemble Drill To break through the first layer of crust, the crew deploys a steel pipe with an 11-inch-wide drill bit at the bottom. The crew attaches new lengths of pipe one by one from the top until the “drill string” is long enough to hit the seafloor.
3. Start Drilling As the drill bit burrows through sediment and rock, a hose in the drill pipes in a synthetic mud to keep the drill cool and the borehole open under the crushing pressures found at those depths.

4. Collect Rocks Every few hundred feet, scientists collect rock samples for study. A narrow barrel with a razor-sharp edge (think of a very big apple corer) shoots down and pierces the undrilled layer of earth below. The 31-foot-long core samples are analyzed for their chemical and magnetic properties.


Synthetic Mud: A viscous cocktail of minerals, polymers and seawater stabilizes the borehole walls. Because the mud is expensive and could be harmful to ocean life, it is recycled back to the ship during drilling.

Wednesday, May 12, 2010

The Next Generation Wind Turbine


To take advantage of the strong winds that blow over the ocean, this gearless turbine uses a giant ring of magnets and 176-foot blades . There’s enough wind energy along our coastlines to power the country four times over, and the race is on to build the best offshore turbines to capture it. Manufacturers worldwide are experimenting with two techniques: ever-longer blades to harness more gusts, and simplified drivetrains (including new generators) that slash the need for costly repairs at sea. GE’s upcoming machine, slated to go online in 2012, will combine both into one package.


A Twist on Blades: The longer a turbine’s blades, the more wind it captures and the more electricity it creates. “If we could, we would just build infinitely longer blades,” Mercer says. “The problem is, blades get heavy and flexible.” That flexibility, coupled with the force from very high winds, can bend blades so much that they burden the machine or even smack the tower. So GE designed a blade that twists as it bends. It’s curved backward about eight feet, instead of extending straight out. When a gust pushes the tip up, the blade twists slightly around its curve—instantly angling itself so that it bears less of the gust’s brunt yet still captures a large part of its energy.


GE created lightweight 176-foot blades—about 40 percent longer than the average—with a more aerodynamic shape. The blades will attach to a drivetrain that does away with many of the moving parts, including the gearbox, that are prone to breakage and energy loss. A direct-drive mechanism replaces gears, and permanent magnets replace the electromagnets that require starter brushes, coils and power from the grid every time they fire up. The blades are now being tested in the Netherlands, and the drivetrain in Norway. Combining the two should result in a turbine that captures 25 percent more wind power than conventional models, so it can operate more often at its full four-megawatt potential—enough to power 1,000 homes.


Design Highlights on the Windmill
Generator: The 90-ton generator consists of a nearly 20-foot ring of magnets that spins to produce current. Its large diameter lets it create a lot of power when turning slowly, at the same 8 to 20 rpm as the blades, so it doesn’t need a gearbox to speed it up to the thousands of rpm most megawatt generators require. “Get rid of the gearbox, and now you don’t have to change the oil,” says GE engineer Gary Mercer.

Electrical Circuitry: Converters stabilize the current’s varying frequencies. Transformers boost voltage from 690 volts to more than 22,000, so current travels efficiently over long-distance lines.

Pitch Controller: To maximize lift as the wind speed changes, a controller can automatically rotate each blade anywhere from a fraction of a degree to multiple degrees per second. It can also turn the blades away from dangerously high winds to avoid power overloads or hardware damage.

Blades: Light, stiff carbon fiber replaces fiberglass at critical points in the blades, so they lose pounds and gain strength. A flat (rather than tapered) edge gives them a shape that increases lift.

How to Spin Power
1. Position the BladesBased on data from wind-direction sensors, a yaw-drive motor turns the nacelle to face the wind. A pitch controller rotates each blade around a bearing, setting it to the best angle for the wind speed.

2. Capture the WindThe three-bladed rotor spins in winds from 7 to 70 mph, sweeping twice the area of a football field. A 23-foot-long steel rotor shaft and two roller bearings transfer the mechanical energy to the generator.

3. Turn it into ElectricityThe shaft spins the generator’s neodymium magnets inside stationary copper coils, inducing current in the coils. Circuitry adjusts the frequencies and voltage of the current and sends it off to the grid.


Friday, May 7, 2010

Bike's Electric Shock (Simon)


Cannondale's Simon is the first completely computerized bike-suspension fork. It features a hydraulic shock that can instantly change its resistance and how far it travels. Meanwhile, motion sensors and a computer calculate the best settings for the trail. If you suddenly launch off a jump, the shock softens for a smoother landing. Once it reaches a flat area where your pedaling hard, the shocks firms up to boost your power. Simon is currently a prototype, but cannondale expects pieces of the technology to arrive on bikes within a few years.


How It Works:
1. A joystick lets riders select among five preset settings, such as “DH” for swallowing up big downhill impacts. You can also elect to have the suspension continually recalibrate itself.

2. A motion-sensing accelerometer in the front fork detects bumps and impacts. Meanwhile, an optical sensor inside the shock keeps track of its position, gauging how open or compressed it is.

3. Info from the sensors is sent to a computer 500 times a second. Software decides how to change the suspension based on how many bumps you’ve hit, how far the shock can still move, how fast you’re going, and more.

4. An electric motor adjusts the shock. It’s a typical hydraulic shock in which a piston pushes oil through a valve, but the motor changes the valve’s size. Smaller means less oil flow and a firmer ride, while larger means a more cushiony ride.

5. The shock readjusts with thousandth-of-a-millimeter accuracy every seven milliseconds. It protects you from bumps faster than the human brain can register them,much less react.

The Lab That Fits In Your Hand


A piece of plastic as a size of a credit card. It is combined with a book-size gadget that can diagnose as many deadly diseases as big laboratory machines can. Among all of the innovations, it can process results quickly and it can be purchase cheaply.


Most blood tests require shipping vials off to a lab, followed by several days of nail biting. This kit is one of the first that can diagnose multiple diseases on the spot, shrinks an entire lab into a two-piece portable package that even novices(beginner) can use. A disposable, $1 plastic card, formed through injection molding, holds miniature versions of test tubes and chemicals. In place of technicians or $100,000 machines, a battery-powered, $100 gadget mixes the molecules. The prototype from Claros Diagnostics and Columbia University bioengineer Sam Sia, is currently being tested in Rwanda where potentially lethal diseases like HIV/AIDS often go undetected. Sia’s latest study estimates that global access to a low-cost test for syphilis, for example, could prevent a million stillbirths a year. “In the U.S., point-of-care devices like this are attractive because they are more convenient,” Sia said. “In developing countries, there is simply no alternative.”


The Lab That Fits in Your Hand The handheld analyzer contains a microprocessor, a micropump, photodetectors, LEDs, and a nine-volt battery that powers them all for two weeks. Designed in conjunction with the company Smart Design and Pratt Institute’s Design Incubator, it measures 9.5 by 4 inches.


Step-By-Step procedure of using the device


1. Add Blood Sample: A worker draws a drop of blood into a tube and attaches the tube to holes in the card. Then she puts the card into the handheld analyzer. Inside, a micropump—essentially a small vacuum—sucks the blood through a series of detection zones made up of tiny zigzagging channels.


2. Trap Signs of Disease: In each zone, the walls are lined with a different antibody or antigen—a molecule that binds to disease-indicating proteins—that makes those proteins stick to the sides as blood flows by. One zone captures anti-HIV antibodies, one collects syphilis markers, and in the future, the other zones will trap more STDs. The blood passes a blank zone, used to rule out false positives, and pools on paper to avoid a mess.


3. Make the Signs Visible: Microscopic disease proteins are hard to detect, so two kinds of molecules turn them a color that the analyzer can measure. The molecules (prepackaged in the card) travel to the detection zones when the vacuum sucks them up through channels, across the blood-sample tube and down to the detection zones. (The path lengths ensure that the molecules reach the zones in the right order.) The first set, antibodies tagged with gold nanoparticles, attach to any captured proteins. A silver development solution follows, plating onto the gold particles to form easily seen silver.


4. Get the Results: The solid silver is visible to the naked eye, but a photodetector in the analyzer measures the intensity of each zone more exactly. That lets it determine if there’s enough silver, and thus enough trapped proteins, to indicate disease. Then it flashes yes or no on its digital display—with accuracy similar to lab tests—just 20 minutes after the first finger prick.